
Registration of your Sentia device
When turning on the Sentia Device for the first time, a connection to strong Wi-Fi signal is required, preferably 2.4 gHz (Wi-Fi frequency band). You can also use your phone hotspot.
During registration, you will also be prompted to enter your email to receive a verification code, which may go to your junk mail.
After setup, update your device to the latest software version. Learn how to update the Sentia software here.
General Device Use
User Guide and Sample Preparation Guide:
Review the User Guide and the Sample Preparation Guide before using Sentia.
Operating and Storage Conditions:
Operate the device within 10-30°C (50 -86°F) and <80% humidity (without condensation).
Store the device at 2-40°C (35.6-104°F) and <80% humidity (without condensation).
Connect to Wi-Fi:
When conducting a test, you do not require Wi-Fi connection, however whenever in range, we recommend staying connected to export test results and receive software and calibration updates.
Charging and battery care:
Use the supplied charging cord. Avoid using generic chargers. Maintain good battery charging habits and do not overcharge. Find battery care and maintenance tips here.
Cleaning:
Clean spills immediately. Follow general and strip port cleaning instructions here.
Use the Sentia analyzer case to further protect the device from spills.
General Use of Strips and Buffer
Close Vial Lids:
Close vial lids after removing strips and pipetting buffers.
Do Not Mix Buffers:
Avoid mixing buffers from different vials, even if the batch number is the same.
Storage:
Store strips and buffers as recommended on the vial.
Use Strips Quickly:
Use strips within 10 minutes of removing from the vial.
Single Use:
Do not insert the strip into the device more than once.
Dry Hands:
Handle strips with dry hands.
Avoid Flooding:
Do not flood the test strip with the sample.
No Additional Sample:
Do not add more sample once analysis has started.
Sample handling and dilution
Retrieve Your Wine Sample:
Ensure the sample accurately represents the wine being measured and is consistently removed from the same homogenate area of the tank or barrel.
- From a Sample Tap: Let some wine flow out first before collecting your sample.
- From a Barrel: To obtain a representative sample use a wine thief to draw the sample from well below the surface.

Immediate Testing:
Test the sample immediately after retrieval to prevent changes in the analyte concentration.
Sample Pre-treatment:
Degas samples with visible gas, except when testing for free SO2.
For turbid samples or those with excessive particulates, centrifuge, filter, or let settle before analysis, except when testing for free SO2. See the Sentia Guide to Sample Preparation here
Equilibrium:
Allow the wine to stabilize after any additions or significant changes. For example, after adding sulfur, allow the wine to stabilize for at least 12 hours, before conducting free SO2 analysis.
Minimize Oxygen Exposure for Free SO2 testing:
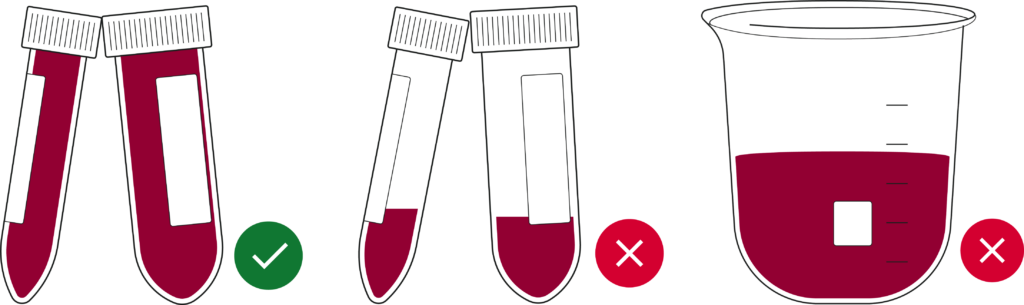
When transferring the sample, be careful not to draw air up through the transfer pipette to prevent oxygen from bubbling through the sample.

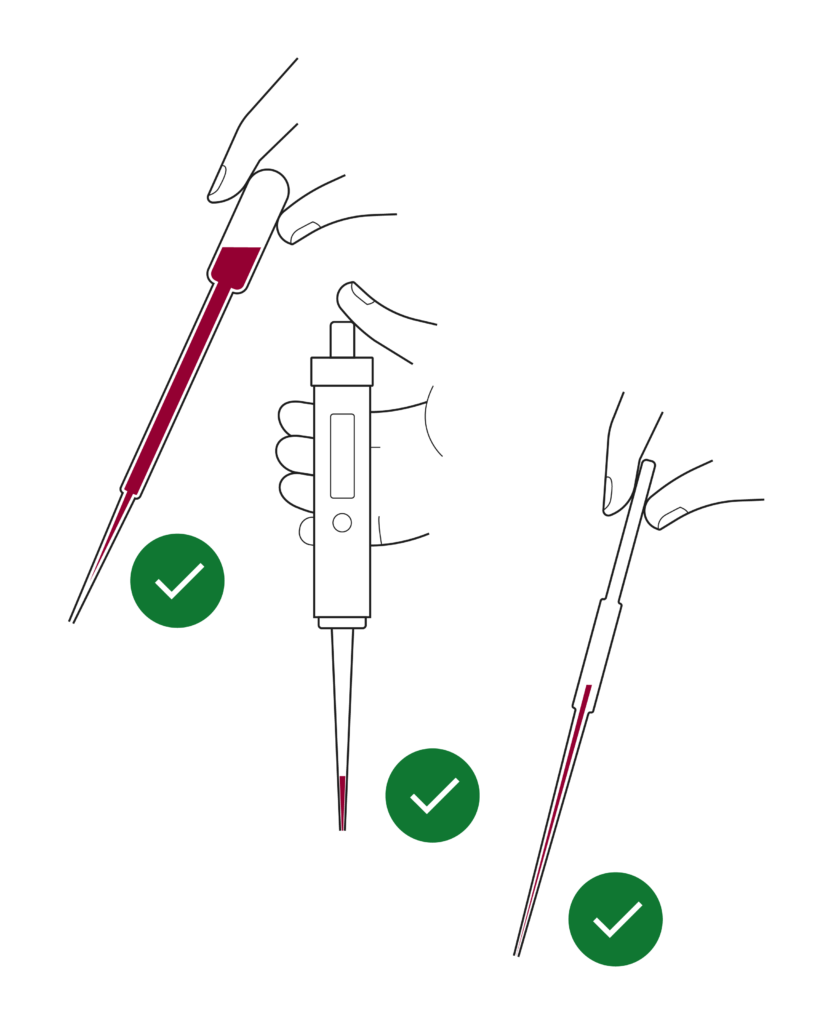
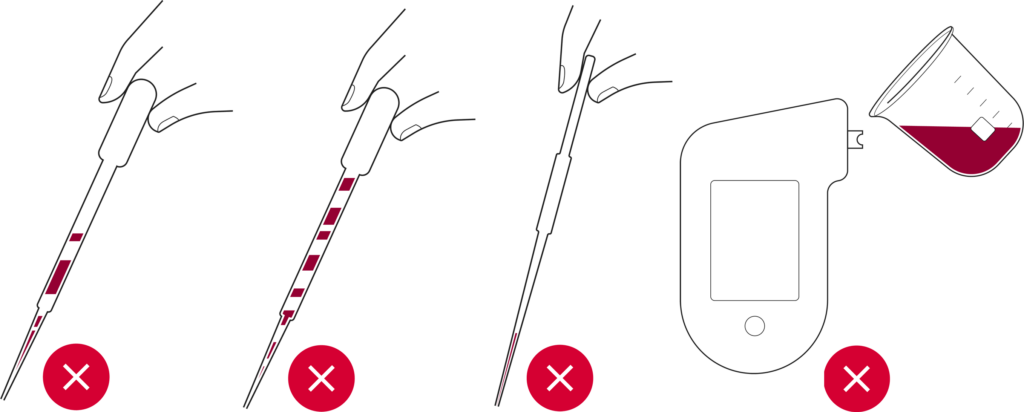
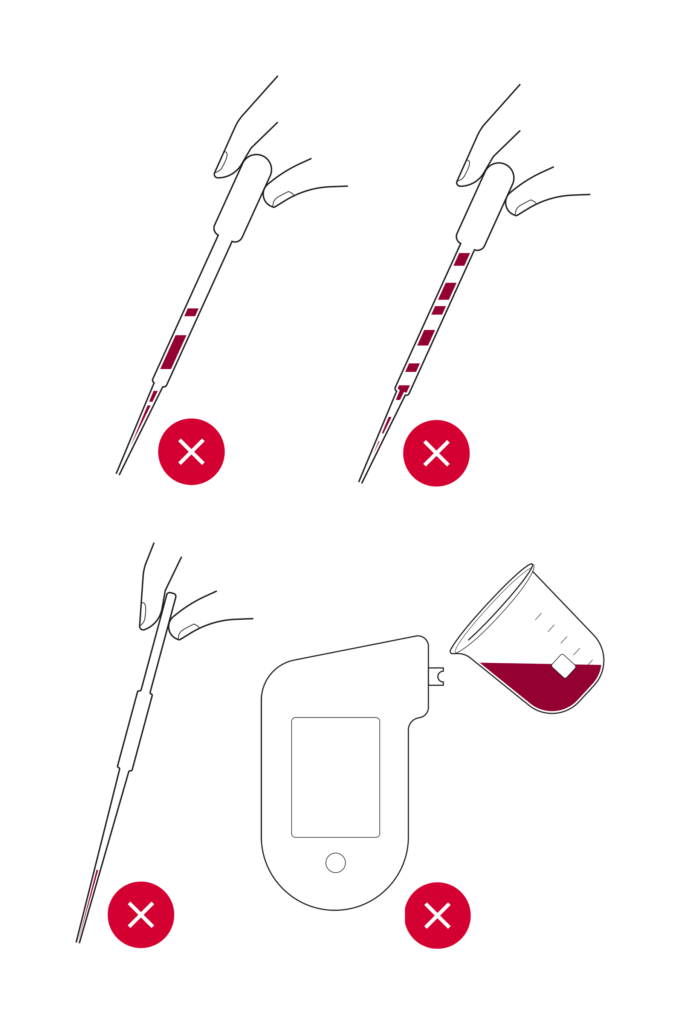
Ensure the pipette or wine thief is filled with sample to minimize the surface area of wine exposed to oxygen. Apply the sample immediately after drawing. If immediate analysis is not possible, fill a vial to the top with sample and cap tightly with no air pocket.
For further information regarding how to ensure accurate free sulfur results, see here.
Comparison testing
If conducting a comparison analysis, use the same aliquot for both Sentia and the reference method. Minimize the time interval between the Sentia test and the reference method test. For free sulfur, always test the sample on Sentia first due to the small sample size and associated risk of oxidation.
Using a Micropipette:
Ensure accuracy:
Follow the manufacturer’s instructions for use, maintenance, and service. Practice with water first to get comfortable with the pipette.
Select the right pipette:
Use the appropriate pipette for your task. For example, for Sentia, use a 100 – 1000 uL micropipette.
Use correct pipette tips:
Always use tips that are compatible with your pipette. Do not reuse tips to avoid contamination.
Timing of tests:
Conduct tests within 30 minutes of preparing the dilution.
Follow dilution ratios:
Only use the recommended dilution ratios to ensure measurement accuracy.
For additional support on the required dilutions for acetic acid, malic acid and fructose and using a micropipette correctly, please see our guides here.
Support and Ordering
For all additional help topics and to access the Sentia Customer Support Team, use our Support Portal here. To order strips contact your distributor, or if USA based, see https://sentiaanalysis.com/shop/